|
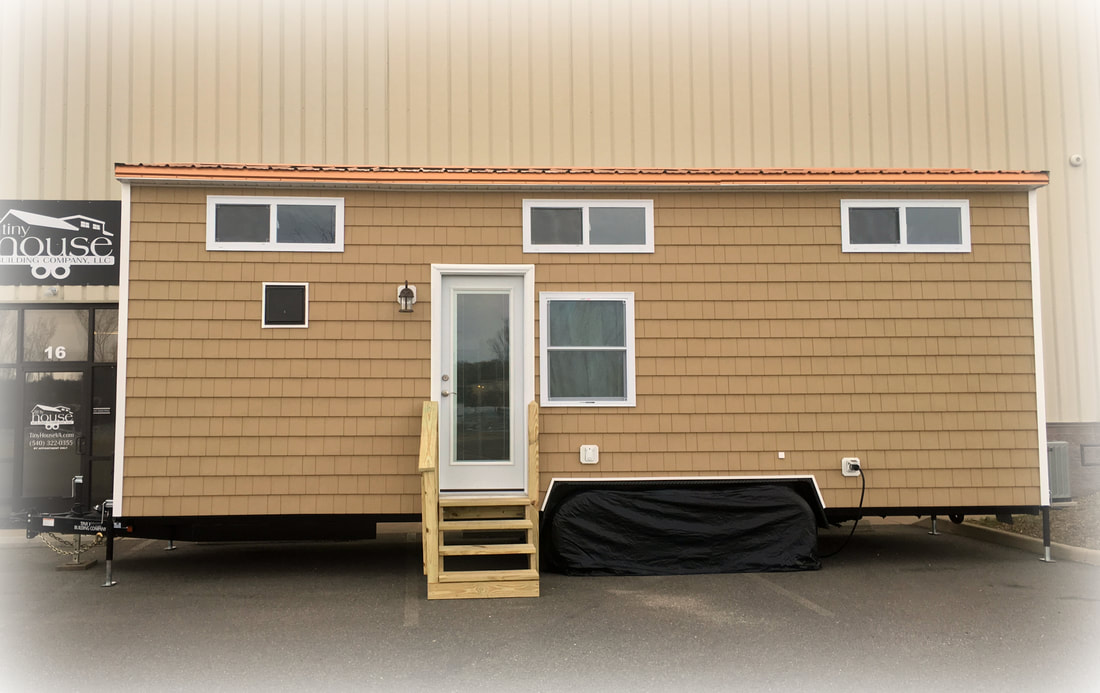
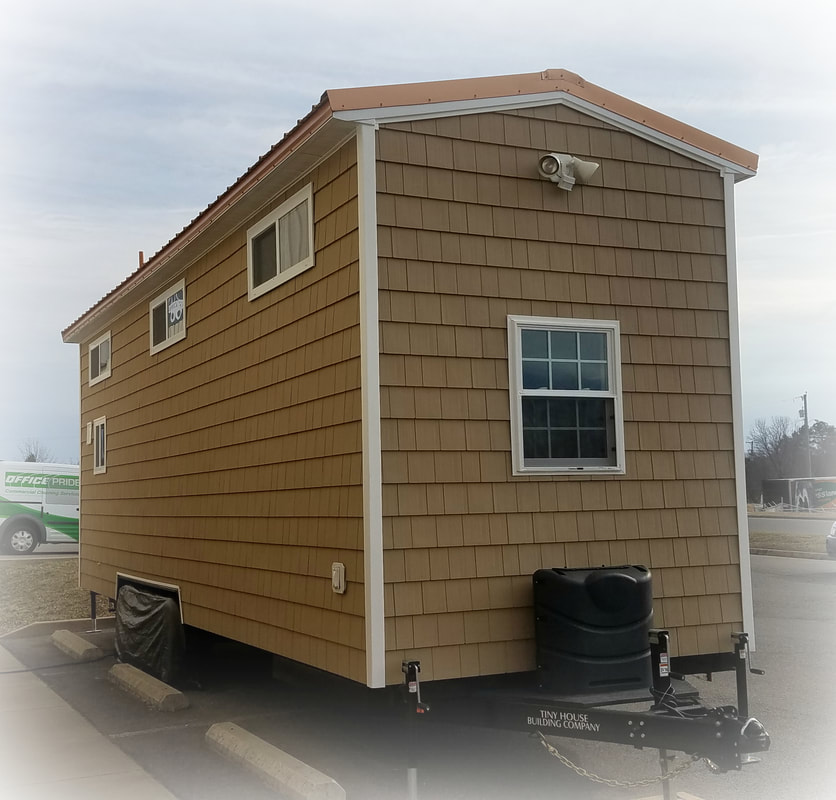
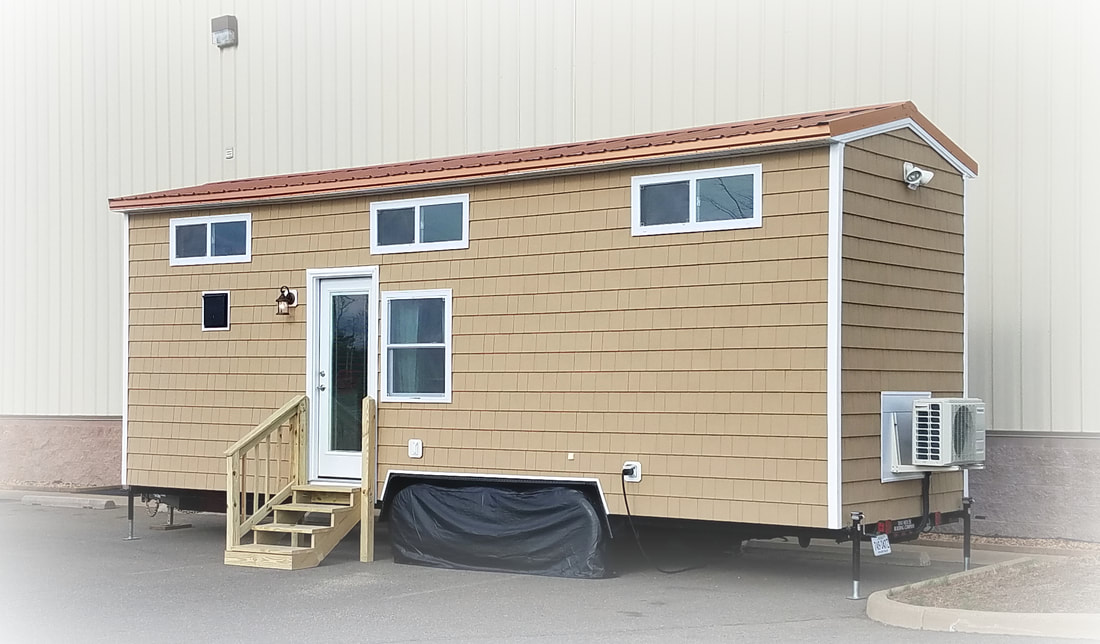
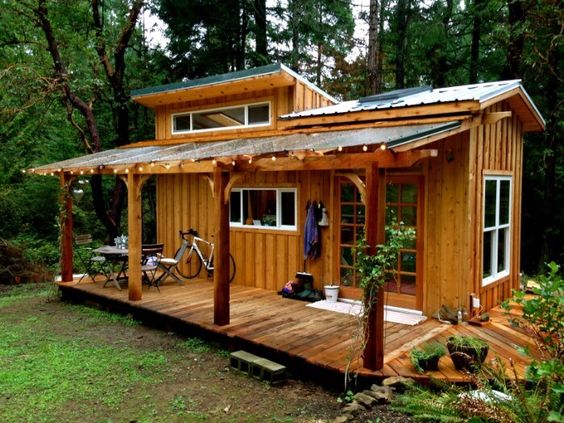
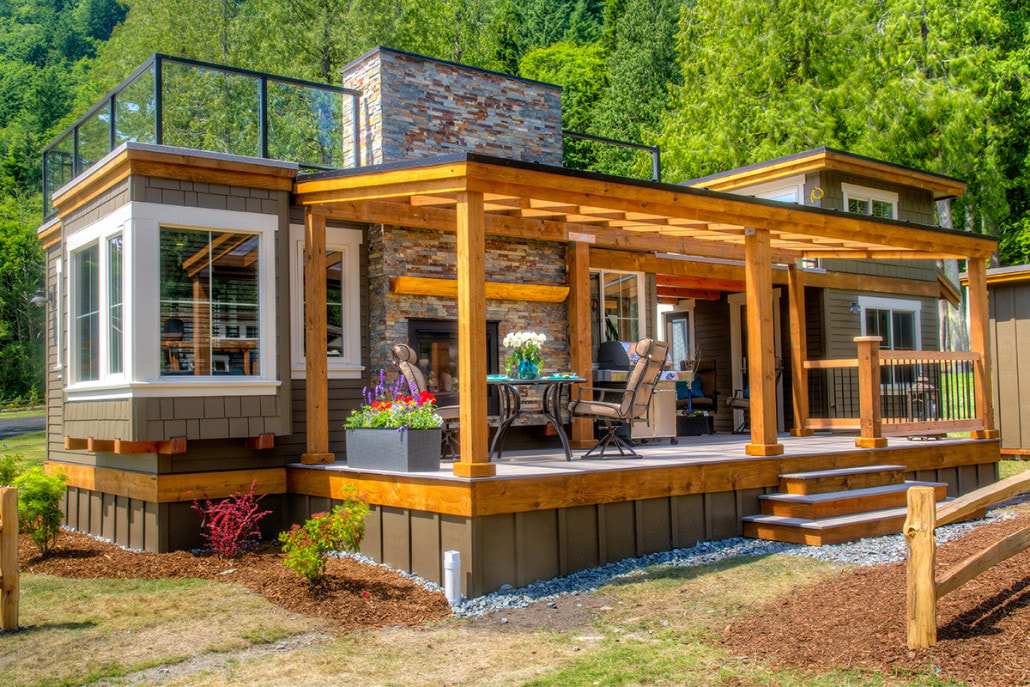
The end is near...this is my final blog post in my tiny home series. I've been taking you through each room of the model tiny home I'm in love with and explaining the changes I'd like to make if I were to customize the design for myself. Here are the links to check out the first three posts: Today I'll be showing you the exterior of the model home and then talking about the ideas I have so far on how I want to customize it. This area of the house is the least defined in my head, so I've still got a lot of decisions to make. Let's get started! The Exterior I've already talked a little bit about how I'd ideally like to have double glass doors for my entry. You can see from the outside that the living room window would definitely need to move over for that to happen. Also, I'm thinking of leaving the center window up top in place but then removing the outer windows. Those windows are currently in the lofts, but if I add skylights to each room then I think I will have plenty of light (and more privacy) without the side windows. This picture shows the siding better than the first exterior picture. I don't mind the shingle material, but I really don't love the color. I'm thinking I'll switch to a gray color and keep the white trim. You can also see the small side window that goes into the bathroom, which I'll definitely be removing. However, I will keep the kitchen window on the end because I love how it looks both from the inside and the outside. I also think it would be cute to add either shutters or a flower box to add some extra decoration to the outside. It's kind of hard to see, but the model's roof is made out of copper. Generally, I like the look of copper, but I don't think I'd want it as a roof material. Also, like I mentioned in a previous post, I'm planning on having a flat roof, so that will change the aesthetic a little bit too. Even though I'd like to have a rooftop "patio", I don't want to add railings or anything permanent, so it will be more of a rooftop "pad". I'm basically envisioning just a flat surface to put pillows and blankets on when I want to lie down and look at the stars. I don't think I've given the dimensions for my dream tiny home yet. I'm thinking I'll end up going with a 28-foot trailer. The width would probably be about 8.5 feet and the height would be somewhere around 13 feet. It seemed like a good idea to get a realistic view of my future living space, so I measured out the dimensions in my apartment last night. It looks like the main floor will take up about the same amount of space as my current living room and dining room. That doesn't take into account the 2 lofts or the 13-foot ceiling though! All together the house would be just over 400 square feet, which is less than half of what I live in right now. Thankfully, with all the built-ins I won't need to keep hardly any furniture other than my couch and mattress, so that will get rid of the majority of what fills up my current apartment. I've also been slowly weeding out stuff and will continue to do that until I've got a realistic amount of possessions for a tiny home. Now here are some of my ideas for the rest of the exterior once it's placed on the lot it will live on. I'd really like a deck/porch in front of the house. Here's a picture of an idea I found on Pinterest: These are both pretty elaborate, but it gives you a basic idea of what I'm thinking of. I don't want anything attached to the tiny home, so most likely I wouldn't have a roof over the porch. I'd really just like a nice way to get into the house that's a bit more civilized than some rough plywood steps. A porch is also a nice way to cover up the trailer wheels and give the house more of a permanent kind of feel to it. I'm also thinking realistically in terms of storage, so I'd need some type of shed where I can keep bigger items like my suitcase and also store sentimental items like the cedar chest and rocking chair my grandpa made by hand. Getting a storage unit for the short-term is definitely an option, so this would be on my to-do list once everything else is settled. The last thing I'd like on the outside of the house is an unattached carport. That would obviously be a wish list item and not a top priority, but it would be nice to finally not have to brush snow off my car every single winter! And that's it! The end.
I will try to post an update once I'm able to sit down with a builder and discuss further details. Hopefully nothing major will change in my vision, but you never know. I'm also super tempted to go wander through Home Depot and start picking out faucets and door knobs, but I know that is WAY ahead of schedule. But anyone who knows me can tell you that I'm a details kind of girl, so I guess that's just how I roll! I hope you've enjoyed this blog series! Let me know in the comments what you think of my dream tiny home. I also want to know: would you ever want to live in a tiny home?
1 Comment
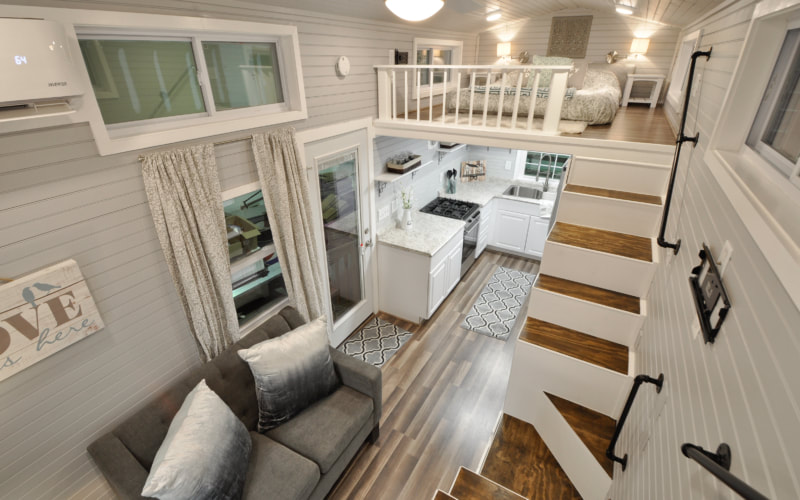
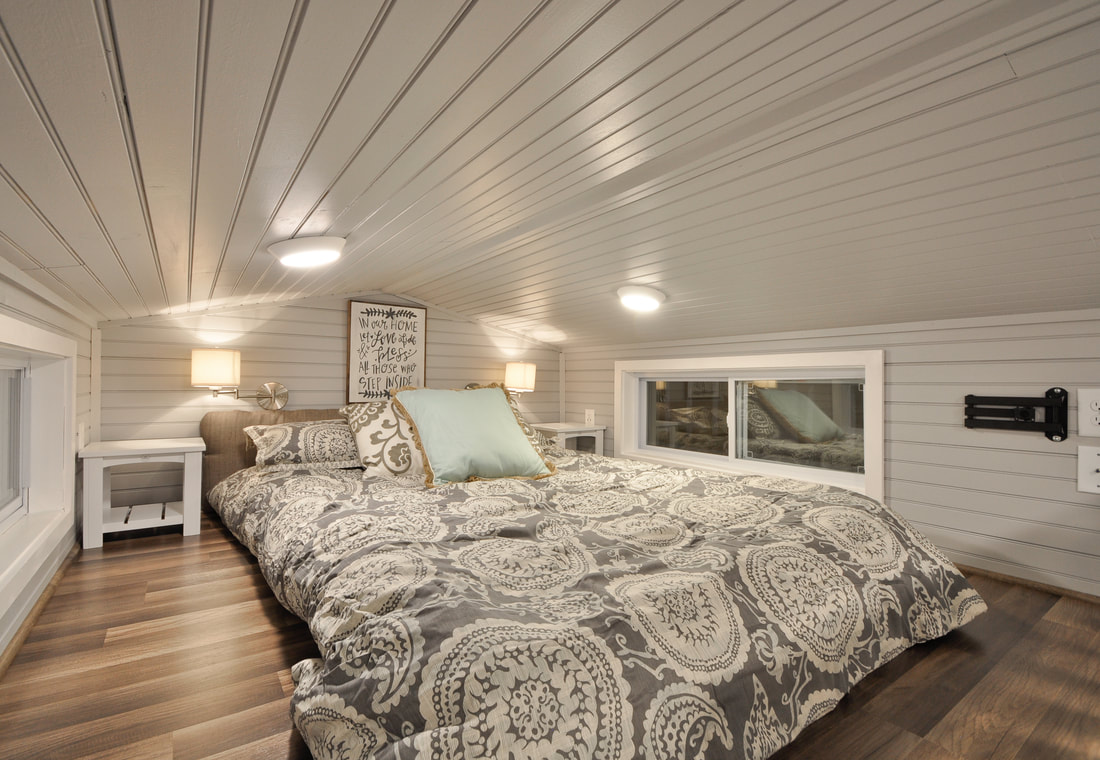
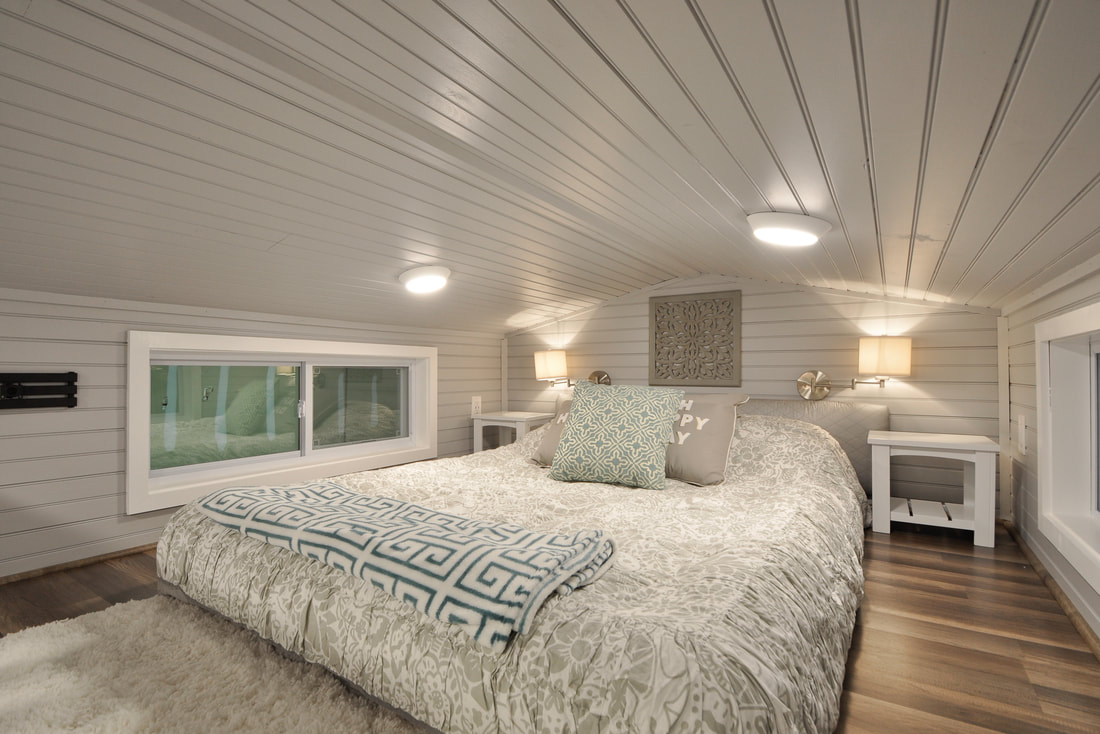
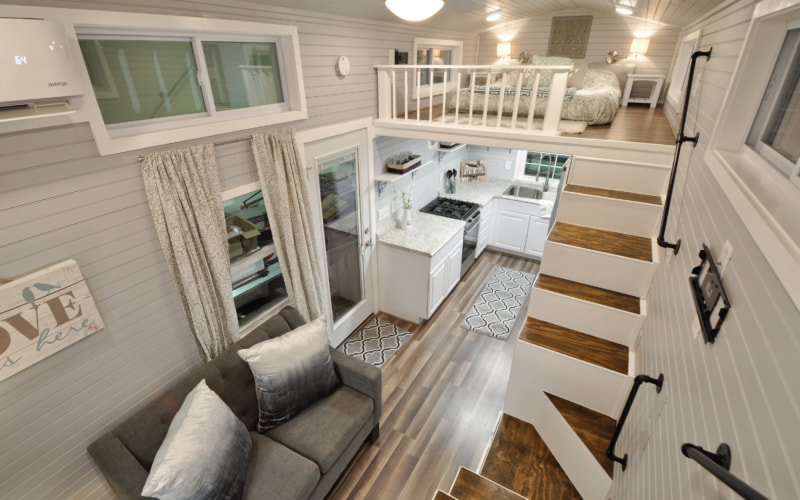
This is the third post in a series about designing a dream tiny home. In the first post, I talked about the entry and the kitchen. And then in the second post, I talked about the living room and the bathroom. Check them out if you'd like to see the rest of the house! Today we'll be walking through the two lofts upstairs. The biggest difference in my own design will be that the ceiling won't be quite so pitched. The builder I talked to said that it's completely possible to do a flat roof, which gives you a lot more head space in the lofts. So try to picture more of a traditional ceiling rather than the angled ceiling you see in the pictures. The Bedroom One of the things I like the most about this layout is how much space you get in the lofts. In a lot of tiny homes you barely have room for a bed, let alone room to walk around either side of it! For my bedroom, I decided to use the loft over the bathroom. Even though the walk through the living room wouldn't be that long, it still might be nice for midnight bathroom trips to have them on the same side of the house. In the bedroom I'm thinking of having a custom built-in made along the back wall. I'm picturing it having a headboard with a shelf or two and then a nightstand on either side with a drawer or shelf built into it. I do like the idea of the two lamps that are mounted on the wall, so I might keep that idea. I'm also not sure of the mount for a second TV. I think I'd probably get rid of that. My favorite idea for the whole house is to have a skylight put in over the bed so I can see the stars at night. Doesn't that sound nice? With the extra light coming in from the skylight I could probably get ride of the windows and have extra wall space and more privacy as well. Also, with the roof being flat in my design, there's a good chance I could make a patio up on the roof. I'm thinking a second skylight could be put in with a ladder so I can use that to climb up on the roof from inside the house. Pretty cool, huh? The Office/Library I know this picture doesn't look like an office or library, but I wanted to show you the space so I can explain my vision. First of all, I'd remove the windows and probably put in a skylight or two. With all the extra wall space, I plan on having custom bookshelves built in along all 3 walls. This will give me plenty of room to store all my books, which is something I won't be downsizing when I move! Since I work from home, I'll also need a desk to work at. I'm thinking in the center of the far wall I'll have a desk built that connects with the bookshelves so it's all one piece. It won't have to be a huge desk, but I do need space for my two work monitors and maybe a drawer for office supplies. And then depending on how much floor space I have after the built-ins are added, I might also add a reading chair near the railing. This will give the loft even more functionality and really add to the library feel I'm going for. Thank you for staying with me through this blog series! I originally planned on putting everything into one big post, but realized pretty quickly that it would be massive and no one would want to scroll for that long.
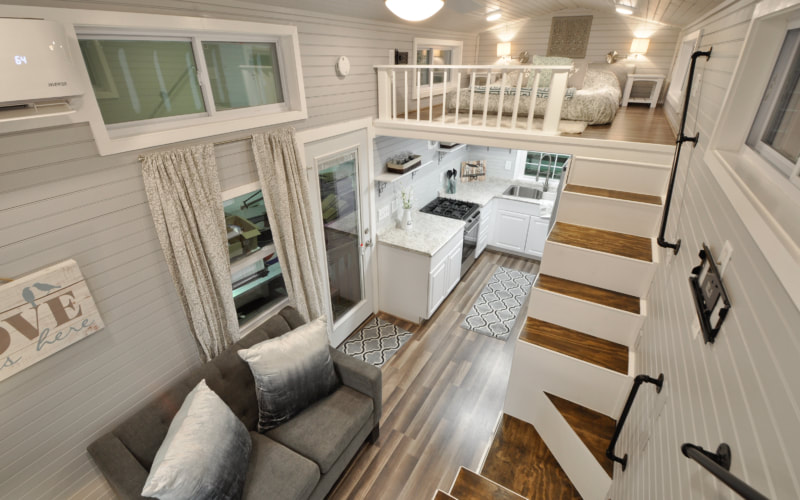
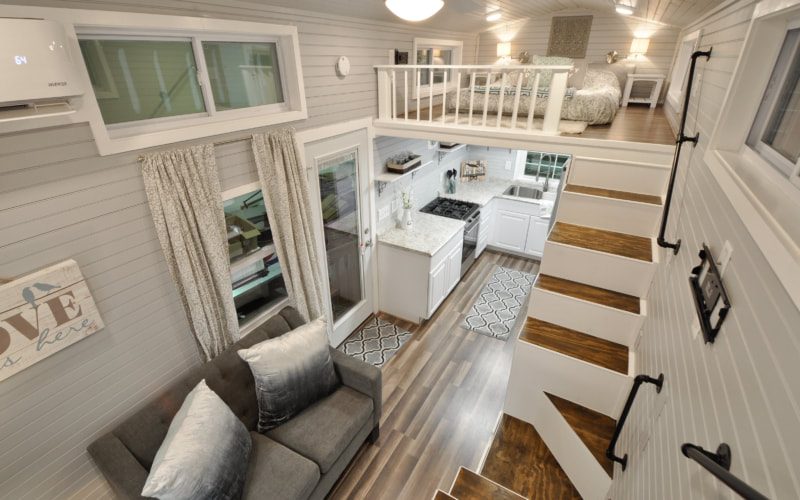
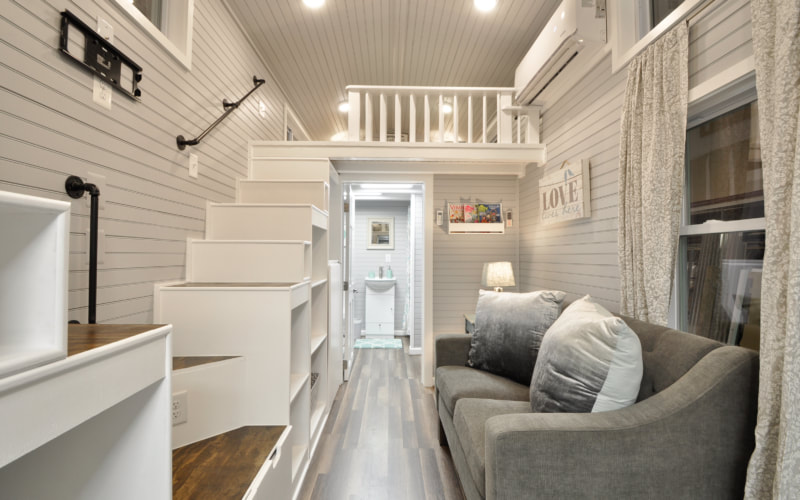
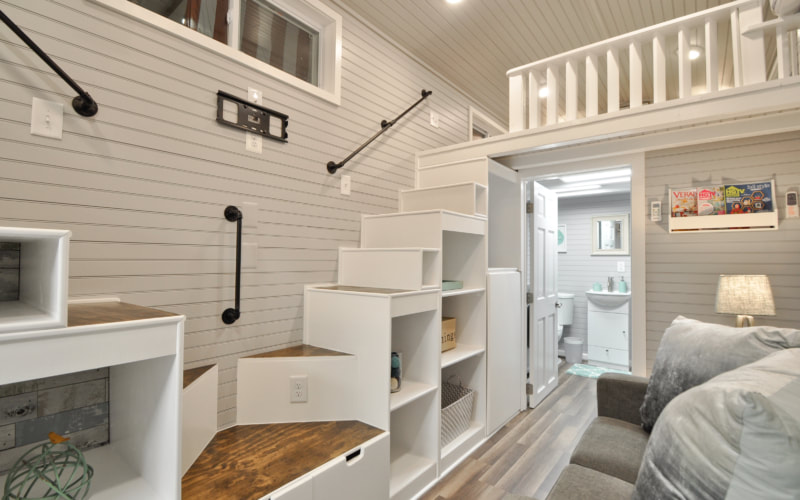
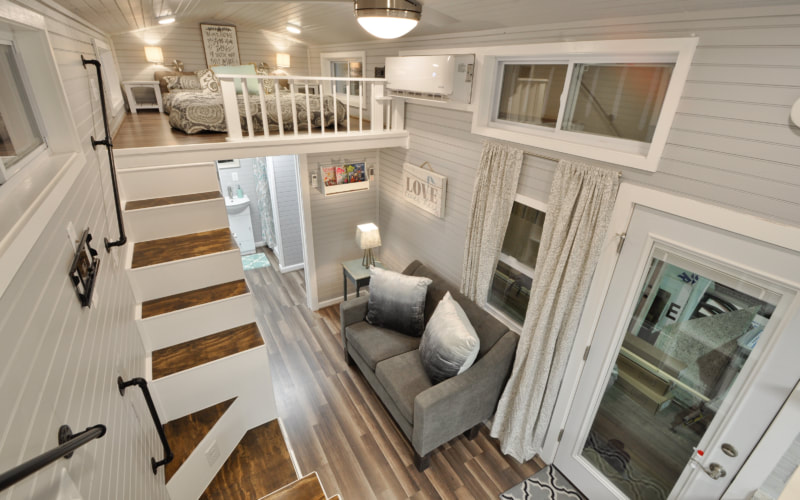
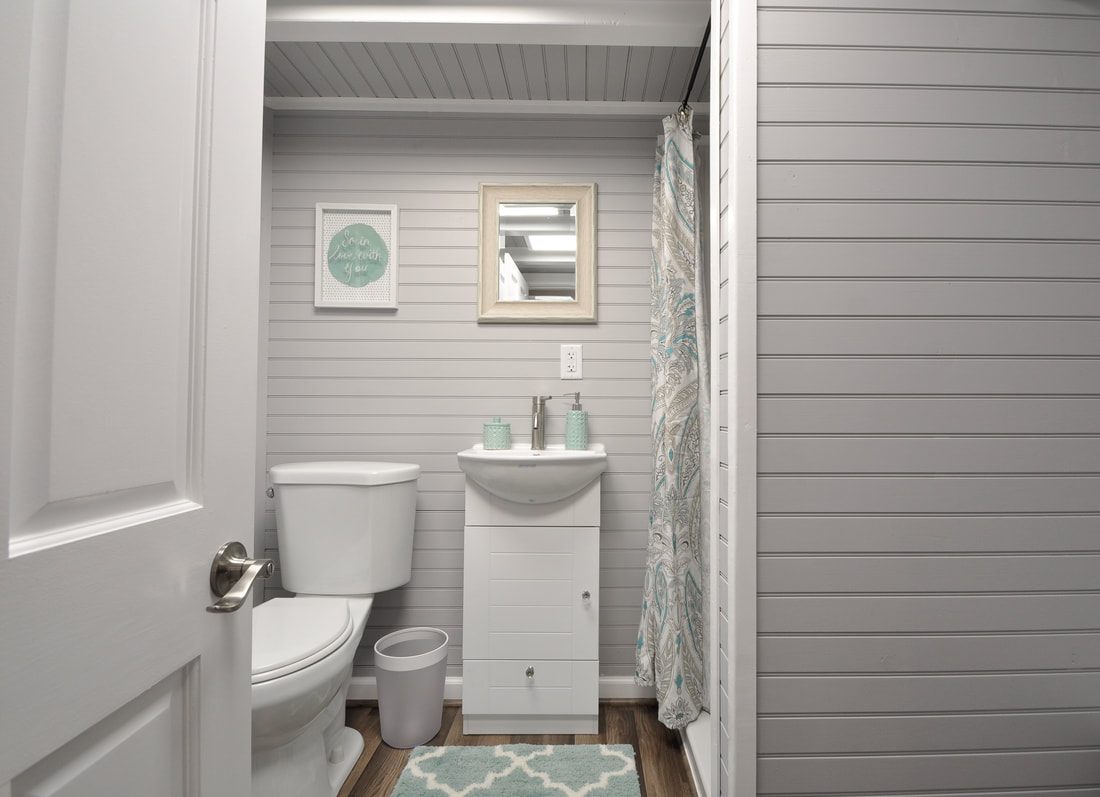
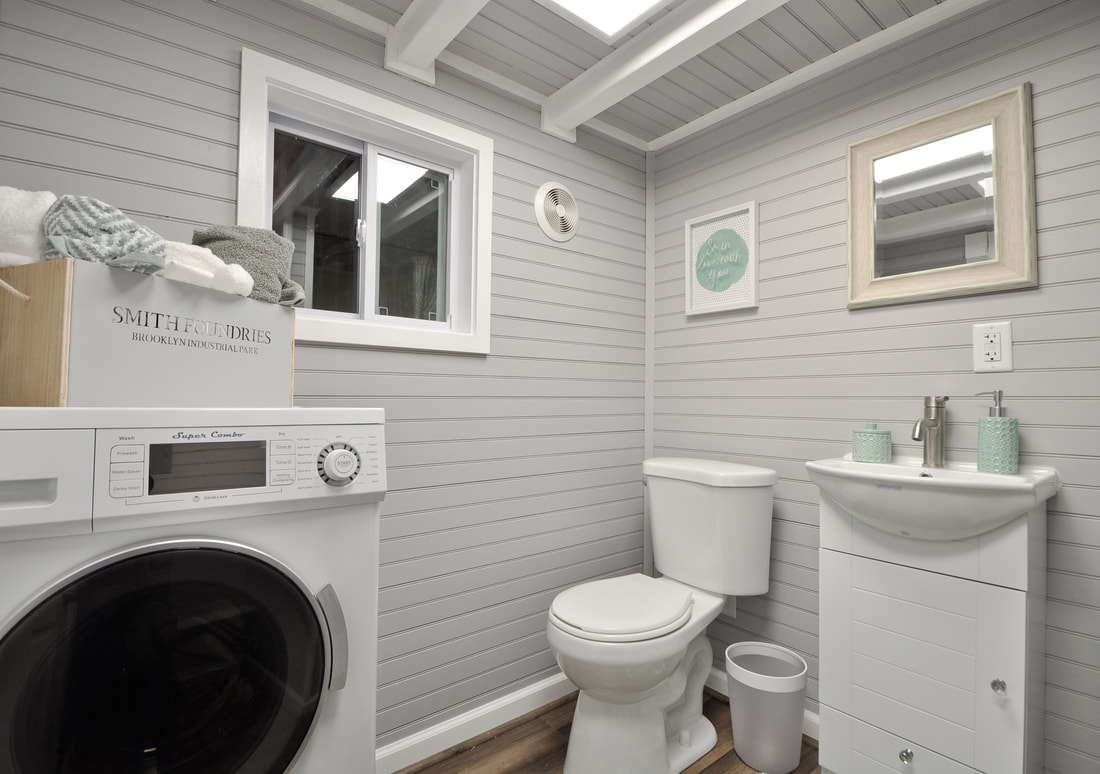
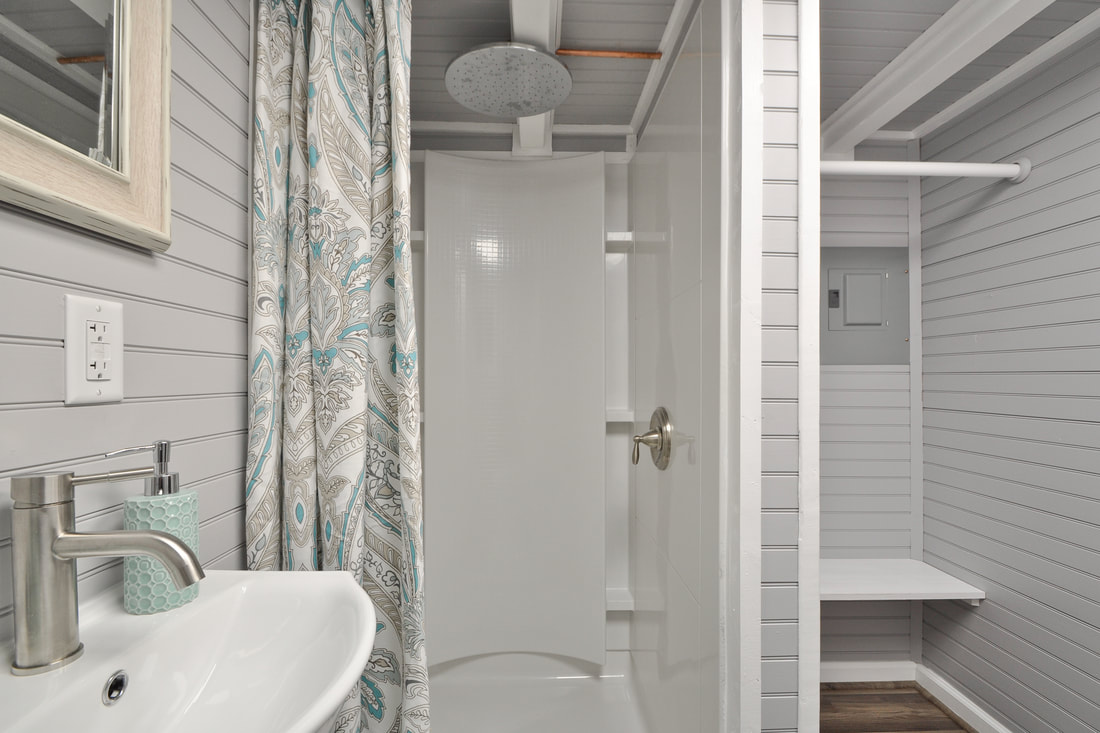
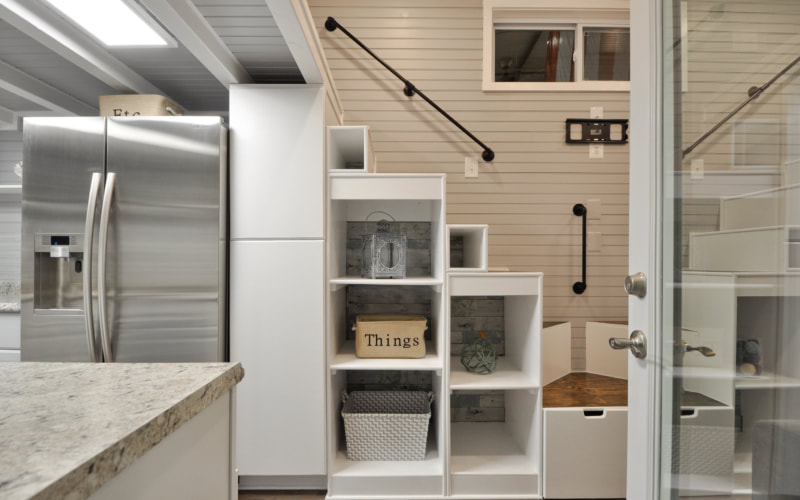
Let me know in the comments how you're liking it so far and what you think of my design ideas. I'd also love to hear if you have any ideas you'd like to share with me. The last post of the series will be about the exterior of the tiny home, including ideas on the rooftop patio I mentioned as well as an unattached porch/deck I'd like to add once the house is placed on the lot. Stay tuned for more! The other day I shared my thoughts around tiny homes and explained that I've been thinking of designing & building my own at some point. Take a look at my first tiny home post to see the pictures of the entry and kitchen. Today, I'll be walking you through the rest of the first floor, which includes the living room and the bathroom. Let's get started! The Living Room As you can see, the living room has stairs leading up to both lofts. The smart thing is that the space under the stairs is used for storage. Super important in a tiny home, right? There's also a mount for a TV on the wall across from the couch, so that helps save some space as well. Here's a better view of the storage that is closest to the bathroom. One of the big changes I'd make is to move the washer/dryer combo that's currently in the bathroom to under the stairs. It looks like there's already a larger cabinet closest to the bathroom door, so I'd like to have the washer/drying built into that space with some shelves above it for my laundry detergent, etc. I can also see storing my extra bath towels up above the washer/dryer because they'd be nice and close to the bathroom. For the rest of the storage I'd probably use that for all my movies, unless I decide to put the discs in one big binder. The other change I'd like to make to this setup is the lower stairs. I'm not a fan of the triangle shaped steps, so I'd rather have that be a half step that goes all the way across. It could also serve as a spot to sit if I had company. The drawers under the bottom step would be where I keep throw blankets or an extra pillow or two. From this view you can see that there is a fairly small couch in the living room. I'd get rid of the table & lamp on the end to make room for a longer couch. I might also move the window over a bit to center it on that wall. Ideally, I'd love to have double glass doors for the entry, but I'm not sure if I'll have enough wall space for that. If you look high up over the couch, you can see the heating & cooling unit. This will provide both heat in the winter as well as air conditioning in the summer. The light at the very top is also a ceiling fan, which I absolutely love the idea of! The Bathroom The bathroom is actually a really nice size! Behind the door is the washer/dryer combo that I plan on putting under the stairs. Off to the right is the shower and the closet. I'm thinking of making some big changes in the bathroom, especially in this area. The first change I'd make would be to either take out the window or make it frosted. It's directly across from the shower, so I'm not sure why the builder thought it would be a good idea to put it there! Also, I think I'd like to swap the toilet and the sink so that the toilet is in the middle of the wall. With the washer/dryer being outside the bathroom under the stairs, this would leave a whole wall open for a sink area. I'd like to have a counter running the entire way across that wall with a mirror over it. On one side I'd have the sink with open space underneath for the cat litter boxes. On the other side I'd probably have drawers or cupboards built in for storage. I can also see setting up a makeup/vanity area at one end, maybe even with a stool for sitting down to do my makeup. It would also be nice to have a medicine cabinet on one of the side walls. On the other side of the bathroom is the shower and the closet area. My first change would be to put in a glass door of some kind instead of a shower curtain. For the closet area, I'd probably take out the bench and put in a second bar halfway down to maximize hanging space. Although, if you read my capsule wardrobe blog post you'll know that I've significantly reduced my wardrobe, so maybe I won't need a second hanging bar. I'd also add a shelf near the top for extra storage, either for shoes or purses. The biggest change I'd like to make in this area is to add in a barn door that slides to close off the closet. With the limited space, a normal door wouldn't really work, but a sliding barn door would look kind of cool. I know it would cover the shower when the closet is open, but I don't see that being a problem since I live by myself. I can't be in the shower and the closet at the same time anyway! That's it for today! In a few days I'll write another post about the two lofts. One will be my bedroom and the other I'm going to make into my office/library. Isn't it crazy how much you can fit into such a small space if you design it efficiently?
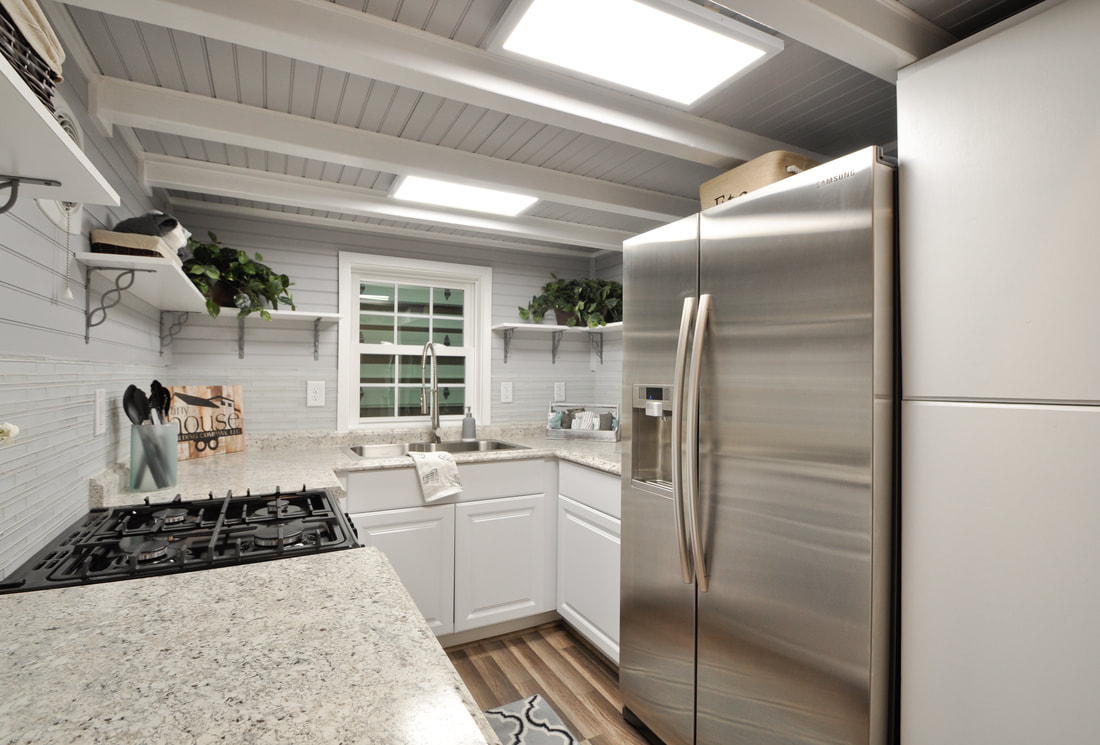
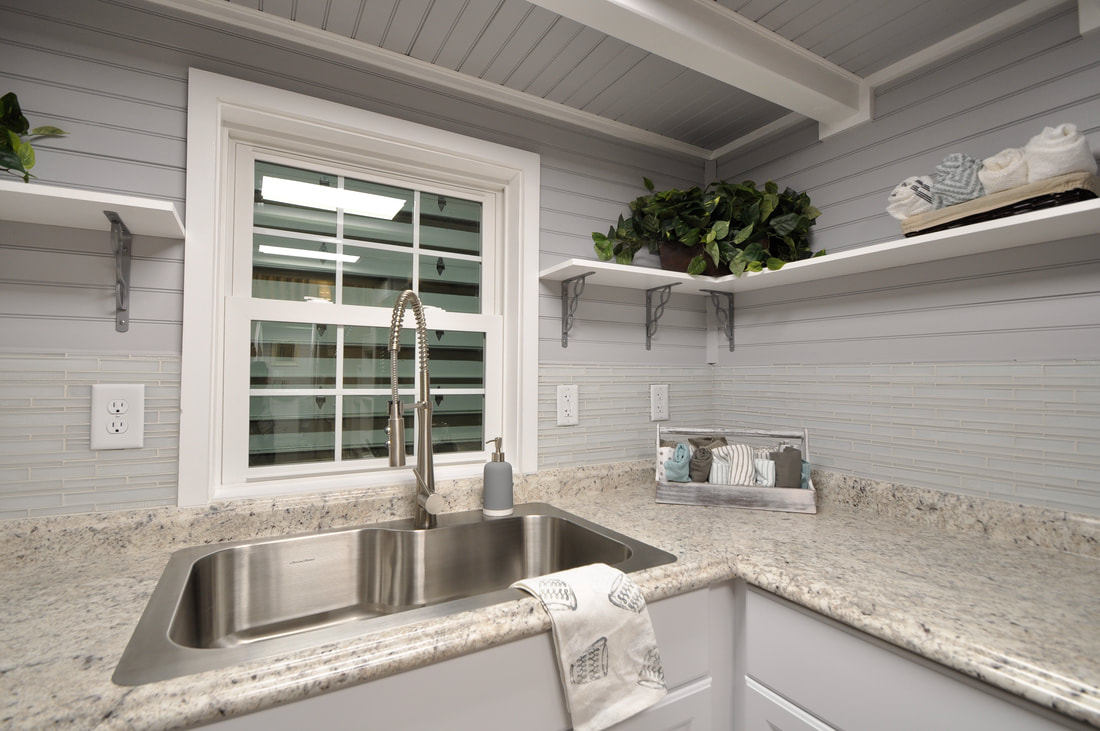
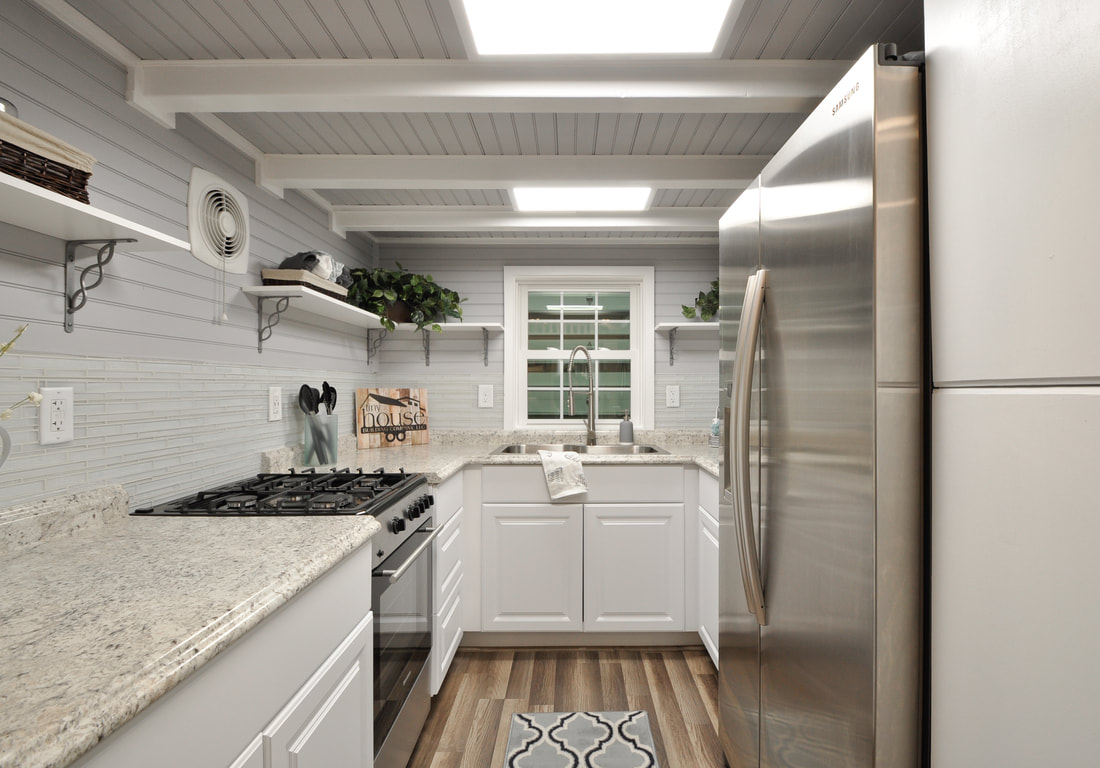
As always, I'd love to hear from you! Leave a comment if you've had your own experience designing a house or if you are dreaming of living in a tiny home. Tiny homes are getting more and more popular every day. It seems like they are being talked about all over the country. There's a documentary on Netflix and even a Tiny House Hunter's show on HGTV. I've always been fascinated by tiny homes. I would personally love an excuse to get rid of half my belongings. Thinking about minimalism and simplicity has gotten me dreaming about designing and buying my own tiny home. I currently live in an apartment, so my monthly rent isn't going towards any type of investment. Wouldn't it be better to spend that money (or even less) on something tangible that I can sell later if I want or need to? Yesterday I went to a tiny home Christmas village where they let you take tours of about 6-8 tiny homes from different local builders. It was my first time being inside a tiny home and it was really cool to see all the ideas and options that are available. I also went to a Meetup with the Denver Metro Tiny House Enthusiasts group. I met lots of nice people and learned a ton of information. One of the people I met was Ryan, who runs the Tiny Home Connection, where you can build and store your tiny house if you are a DIY-er or you can have them build the whole thing for you. And before you think I'm starting to go all hippie, I don't plan on having an outhouse or trying to live off grid. I fully plan on having all the luxuries of a modern house, including a washer/dryer and a flushing toilet! I already found a tiny home model that I love, but it's from a builder in Virginia. My plan is to find a local builder in Colorado and work with them to customize the floorplan I found so I can make it my own style. I'm going to show you pictures of the model, which is called The Kate from Tiny House Building Company. Then I'll walk you through some of the changes I plan on making for my own design. There are lots of pictures, so I'll be breaking this up into a few different posts that I'll share over the next week or so. The Entry When you first walk into the tiny house, you see the stairs leading up to one of the lofts. The kitchen is off to the left with a pantry next to the fridge. The living room is on the right. One of the only changes I would like to make to the entry is to turn the cubby spot with 3 shelves into more of a coat nook. I'd take the shelves out and add coat hooks on the back to make it a nice place to hang up jackets. I'd probably use the 2 shelves next to it for shoes, so maybe I'd make those shorter so I could fit 3 or more shelves in there. I'm also not a fan of the material on the back of the storage area, so I'd pick something else. The Kitchen See what I mean about the luxuries of a modern home? This is a full-size kitchen that might actually be bigger than the one in my current apartment! My first change to the kitchen would actually be picking out a smaller fridge. I don't need one quite that big and that extra space would let me make the pantry on the right even larger. I'd keep the cabinets the way they are, but I'd like to add a dishwasher somewhere, possibly under the counter in the foreground of the picture. I really like the window over the sink and I absolutely love the sink & faucet, so I'll be keeping those. I'm planning on putting a microwave on the counter to the right, which will kind of tuck it away off to the side of the fridge. I plan to keep the open shelves, but I'd like to have 2 sets of shelves on each wall and then remove the two shelves closest to the window over the sink. I'd use that open wall space for my hanging spice rack and probably one of those magnetic strips that's meant to store knives. On the counter next to the stove, closest to the camera, I plan on making a drink station. This is where I'd put my Keurig and some type of storage for all my tea. I'd also like to find a cute way to display coffee mugs. I've seen a few ideas on Pinterest, so maybe I'll find a nice "Coffee" sign to hang on the wall and then hang the mugs from hooks underneath. I also think it's really hard to see the glass tile backsplash because it blends in so much. I'm hoping to do something that will stand out a little more. So that it's for today! There's a whole lot more to share though, so I'll be posting more about all the other rooms in the next few days. In the meanwhile, let me know in the comments if you are a fan of tiny homes and if you think you could ever live in one.
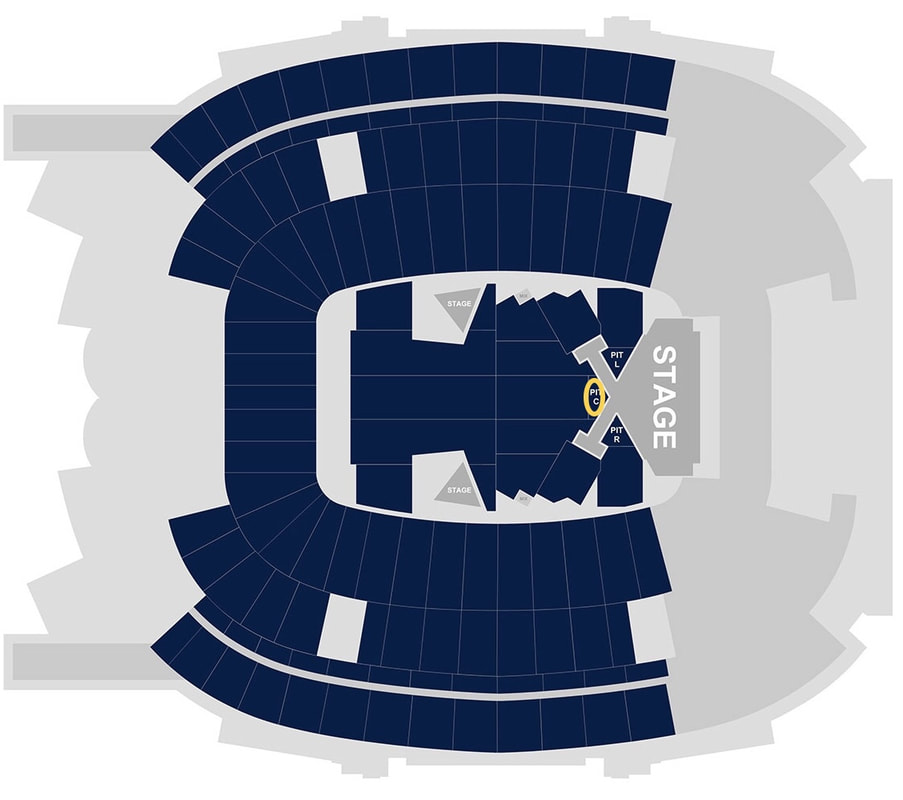
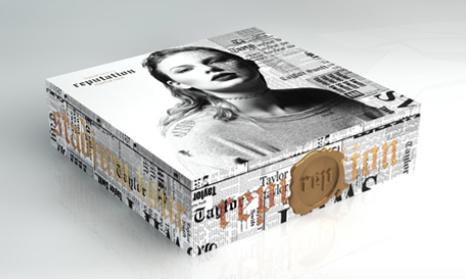
My heart was pounding and my palms were sweating. It felt like I had enough adrenaline to run a marathon. The clock said 1:58pm and my eye started twitching. I only had 2 more minutes to go... You might be wondering what had me feeling so frantic. Was I in a dangerous situation? Was I counting down to a disaster? Nope. I'm anxiously waiting to buy my ticket for Taylor Swift's next concert. Maybe it seems like an over-exagerration, but in that moment I felt extremely nervous and excited. Part of my excitement was because of the 3 months of hard work and preparation that lead up to this moment. Back in August, Taylor Swift announced that she had a new album coming out on November 10. It was also announced that in order to qualify for her concert pre-sale, you would have the chance earn boosts through the Ticketmaster Verified Fan program. You were given the chance to watch videos and buy albums or merchandise to earn as many boosts as possible. Basically, the more time and energy you put in ahead of time, the further up you'd be in line once her concert tickets went on sale. Personally, I liked the idea of this because it made the whole situation feel like I would have some control over my place in line. The main investment I made in the Verified Fan program was my time. I knew I wanted a good seat for the concert, so I made it a point to watch as many videos per day as I could. By the end of the 3 months, I had 2400 boosts! Thankfully, I figured out early on that I could plug in my headphones but not put them in my ears, so I didn't have to listen to the songs hundreds of times over and over. Don't get me wrong, I like her music, but not THAT much. I was also able to play the videos on my iPad, which I would set up next to my work computer. All I had to do at that point was press play. Once the boosts were completed, each person was sent a time slot when they would receive their code to go on the website and buy their tickets. Based on my boosts, I ended up being in front of 99% of the people who wanted tickets in Denver. When they sent me my time slot, I ended up being in the very first group to buy tickets. So, of the 75,000+ people who will fit into the stadium for her concert, I literally had my pick of every seat. This takes me to the moment I described at the beginning of this post, where my heart is pounding and my palms are sweating. I knew my code would show up at any moment, but I didn't know how many other people would be buying tickets at the same time as me. I also didn't know how much VIP tickets would cost, so I was nervous that they would be way outside my budget. It ended up that my nervousness was justified, because the front row ticket I had been hoping for ended up costing $1,500. Needless to say, I wasn't prepared to spend THAT much money on a 2-hour show, so I went to Plan B. I knew a lot of other fans were hoping to get a spot in the center pit, which is right in front of the stage. I wasn't completely sure that I would want to be standing in a big crowd for the whole show, even if it was an amazing experience. But because of the high price for floor tickets, I did end up getting a spot in the center pit. Even that was still more than I had expected to spend, but I knew that I wanted an incredible experience and it literally doesn't get any better than that section. Here's a look at the stadium seating. I'll be in the yellow circle right in front of the stage. Crazy, right? The tickets for the pit section were VIP only, so here is the description of the VIP package: In addition to your amazing seat location, each VIP ticket purchase includes a reputation themed collector's box that is custom designed and uniquely constructed with loaded video screen and other exclusive tour artwork and memorabilia. Also, here are the other benefits from having a VIP ticket:
So, that's my whole experience with getting my ticket to Taylor Swift's stadium tour!! I'm already counting down the days until May 25 and I'm excited that I only have to wait a few months. I'll be sure to write another post after the concert to share how it goes. Let me know in the comments if you're also going to the concert and which city you'll be going in. |
AuthorMy name is Beth and I live in Denver. I am a single lady in my 30's and wanted to start sharing my awesome and amazing life through a blog. Categories
All
Archives
January 2018
|


 RSS Feed
